Very Thin Line Between Designer and DIY

You would never suspect that some of the fabric embellishments in this chic home are hot-glued, or that the majority of the furniture is made from Designer and DIY, spruced up with trim and mirrors.
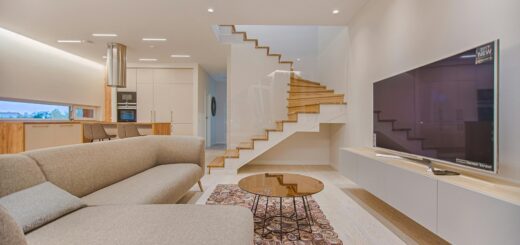
There are Designer and DIY homes that are the labor-intensive result of the owner’s sweat equity, and there are designer homes where every detail is impeccable. Although the two aren’t frequently mistaken, This Home does a fantastic job of blending the distinctions. It is tasteful, well-detailed, conventional but still casually modern. And with her amazing talents, Renee constructed just about everything, from the coffered ceiling to the ribbon decorations on the lampshades.
Like many others, Renee and her husband Alexander got into do-it-yourself Designer and DIY projects because they were strapped for cash when they purchased their first home in 2013. Thus, the pair did their own re-modeling. “It served as our rehearsal home,”
The pair spotted this 1930 Tudor-style home that needed work after Brian’s employment forced them to relocate to Sacramento. Initially, they renovated worn-out elements and added reasonably priced IKEA cabinets that they altered to seem like pricey built-ins. Renee, though, understood that they also needed to reconsider their décor. “Our previous house was an open concept, so none of our furniture fit,” she explains. “It was the beginning of my real interest in design.”
Handmade Console Table
Renee made the most of her available space by converting one end of the living room into a chic and useful doorway. Uneven plaster is hidden with gridded wall paneling. The personalized seat conceals Designer and DIY vents and offers a place to put your shoes. Renee covered the table, which Brian had made, with textured wallpaper, her interpretation of an ostentatious console she’d seen.
How to Look Designer and DIY
Renee wrapped a wooden console with washable grass-cloth wallpaper to give it a more polished appearance. To simulate mitered corners, use folds. Renee used wallpaper paste to stick the paper in place.
Redesigning the ceiling
The couple had an unusual situation when they opened a wall between the kitchen and dining room and discovered that the ceiling beams ended at the doorway. Their answer was to build a coffered ceiling, painted white to lighten, by putting plywood in front of the dark beams and adding beams in the Designer and DIY. Flat-pack cabinet doors look more bespoke when mirrors are added to them.
The Beauty of Threads
Renee’s first foray into home décor projects began with a slipcovered headboard, an undertaking spurred by an expensive estimate to have it reupholstered. Renee adds, “I realized I could use fabrics to create a Designer and DIY home.”
The secret to Renee’s magic is her ability to take simple things and turn them into something straight out of a design book. She put pink paint on the walls of a corridor and wrapped ribbon over doors, around the ceiling, and behind artwork. She covered cupboards with hand-sewn covers and wallpapered tables. She compares sewing to a riddle that you can solve as you go.
Renee’s economical design savvy is evident in the inexpensive framed florals from an art book and the rewired old light. Though they are now busy parents to their daughter Charlotte, Renee never thought she and Brian would become such enthusiastic do-it-yourselfers. They still find time for projects like the.
How to Look for it
Renee spread a small coating of wallpaper paste on the walls and glued ribbon strips, including around doors and moldings, to attach petersham ribbon, which curves readily. Hot glue blobs hold the ends in place.
Modern Living Areas
The pair backed two sets of base cabinets before building an island for the renovated kitchen.
Renee and Brian added crown molding on Designer and DIY Billy bookcases in the living room to make them look like built-ins. The cabinets may be made even more uniquely with details on the fronts and mirrors behind the glass doors.
The pair found an arched brick entrance after they removed a dilapidated fireplace insert. They installed plywood and flat stock trim over the surround and retiled the fireplace.
How to Look For It
The lampshade’s block print design is repeated throughout the living area. Renee used a rubber stamp kit to create the design. She stamped all the way around the shade, straight onto the bare surface, using acrylic paint.
Cabinet doors in the living area are given detail by an X-shaped motif created with screen molding from Home Depot. Renee used double-stick gel adhesive to attach the painted, size-appropriate molding to the door fronts.
Details of a Whimsical Bedroom
Renee added new wallpaper with a chinoiserie design to the guest bedroom. Birds in flight highlight the craftsmanship on the ceiling. She covered the plywood that was cleat-mounted to the walls for the window cornices with a set of drapes. Her first significant sewing endeavor was the headboard covering with the help of Designer and DIY
How to Look for it
Renee collects a piece of cloth and sews it into an elasticized cover to fit over a lampshade. She pins the gathers in place after adjusting them to a uniform spacing. After that, she removes the pins while hot-gluing the collected cloth.
Because there was no closet in the bedroom, the couple made do with Designer and DIY closets and a dresser that Brian constructed. Benjamin Moore Kittery Point wood trim The acrylic handles and green paint give the pieces a visual connection. A mirror frame’s appearance and texture are altered with crushed seashells.
Since the mirror pieces would be visible through the Designer and DIY closet doors, Renee had them cut with polished edges. She adhered each panel to the wall using mirror adhesive. Her simple approach of adding shine is to update cabinet knobs.
To cover up irregularities where the wall and ceiling meet, the couple installed baseboard trim on the ceiling. “We had to come up with a really creative way to finish it off, so we added these square pieces to the ends,” Designer and DIY
Little Blue Dream With Designer and DIY
Renee also has a talent for solving useful challenges in elegant ways. She came up with a lattice-inspired overlay to hide the cracks in the plaster ceiling after she realized how much she hated the effort needed to fix her daughter Charlotte’s nursery.
In Charlotte’s nursery, Renee stayed true to her limited color scheme, casting white and powdered blues in place of the typical little-girl pink. A variety of patterns, such as the toile wallpaper and the large checkered cloth on the ottoman, cushions, and window seat cushion, are brought together by the color repetition. The Benjamin Moore Sea View trim was painted by Renee. The wall’s slope appears less noticeable because to the allover design.
Renee chose to take down the mismatched doors on the side-by-side closets in order to create a changing station and expand the space. She constructed the inside using components from an Designer and DIY closet system, such as shelving and a pair of drawers that served as the changing table’s foundation. In order to conceal flaws in the plaster, wall panels are installed on the ceiling.
Renee came up with the idea of using fretwork wall panels instead of repainting the nursery ceiling. In order to conceal uneven plasterwork and provide architectural interest in an unexpected area, she stapled the panels in place.
Closet shelves have faux-bamboo molding that is half-round. Renee used a miter saw to cut the molding to the proper size before painting it and securing it using construction glue and pin nails.
Even though the Safavieh lamp base’s inky blue pattern didn’t go with the nursery’s color scheme, Renee liked it. After purchasing it, she covered the black splatters with light blue ceramic paint using an artist’s paintbrush. She put wallpaper over the shade.
Clever Space-Saving Specifics
Renee mounted brass flush-end posts to a shelf bottom to maximize the utilization of a hall closet and free up wall space for a shoe rack on the side. Shoes are maintained upright on shelves by acrylic rods secured in place by wall flanges.
Renee painted the lower walls, trim, and cabinets a blue-green color to accentuate the petal design after stenciling the top walls and ceiling of the laundry room. The washer and dryer are concealed by a skirt on a curtain pole.
A Fresh Experience
Renee started sharing her efforts on Instagram as she grew more confident in her Designer and DIY skills and experience decorating. She found out along the way that she liked giving others advice and working through problems together. She made the decision to change careers and set herself up as a decorator after Brian’s job compelled her to relocate to Dallas. Renee is beginning her business with a small number of clients, primarily for a familiar reason but also partly to familiarize herself with the area. One pleated lampshade and fabric-covered cupboard at a time, she is renovating her family’s new house.
FOR MORE POSTS